TensorFlow中的对象检测教程:实时对象检测

 最新推荐文章于 2024-05-15 16:33:35 发布
 阅读量2.9k
 收藏
6
收藏
6


 点赞数
点赞数
导言
创建能够在单个图像中识别和定位多个对象的精确机器学习模型仍然是计算机视觉中的核心挑战。但随着最近深度学习的进步,对象检测应用程序比以往更容易开发。TensorFlow的对象检测API是一个构建与TensorFlow之上的开源框架,可以轻松的构建、训练和部署对象检测模型。
什么是物体检测?
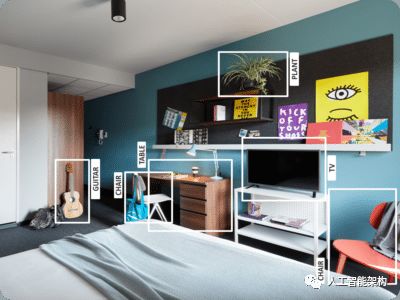
对象检测是在静止图像或视频中查找真实世界对象实例(如汽车、自行车、电视、鲜花和人类)的过程。它允许识别、定位和检测图像中的多个对象,这使得我们能够更好的理解整个图像。它通常用于图像检索、安全、监视和高级驾驶员辅助系统(ADAS)等应用。
对象检测可疑通过一下多种方式完成:
基于特征的对象检测
Viola Jones物体检测
具有HOG功能的SVM分类
深度学习对象检测
在这个对象检测教程中,我们将专注于深度学习对象检测,因为TensorFlow使用深度学习进行计算。
物体检测的应用
面部识别

Facebook的一组研究人员开发了一种名为“DeepFace”的深度学习面部识别系统,可以非常有限的识别数字图像中的人脸。Google在Google相册中使用自己的面部识别系统,该系统会根据图片中的人物自动隔离所有照片。面部识别涉及各种组件,例如眼睛、鼻子、嘴巴和眉毛。
人数统计
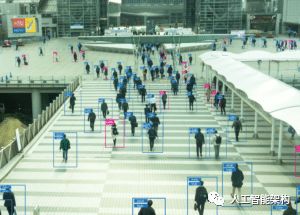
对象检测也可用于人数统计。它用于在节日期间分析商场、景区的人流量。这是一项非常重要的应用程序,因为在人群聚会期间,此功能可用于多种用途。
工业质量检查

物体检测还用于工业过程中以识别产品。通过目视检查寻找特定对象是一项基本任务,涉及多个工业流程,如分拣、质量管理、包装等。
库存管理可能非常棘手,因为物品难以实时跟踪。自动对象计数和本地化可以提高库存准确性。
自驾车
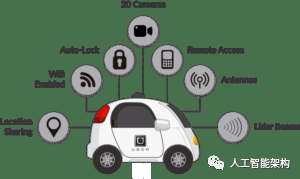
自动驾驶汽车是未来的趋势,他结合了各种技术来感知周围环境,包括雷达、激光、GPS、测距和计算机视觉。
先进的控制系统解释感官信息以识别适当的导航路径以及障碍物,并且一旦图像传感器检测到其路径中的任何生物迹象,它就会自动停止,这种情况发生的非常快,使得无人驾驶向前迈进了一大步。
安全

对象检测在安全性中起着非常重要的作用。无论是Apple的面部IS还是所有科幻电影中使用的视网膜扫描。
政府还使用它与现有的数据库进行匹配,以查找任何罪犯或检测劫匪的车辆。
对象检测工作流程
每个对象检测算法都有不同的工作方式,但它们都以相同的原理工作。
特征提取:它们从输入图像中提取特征,并使用这些特征来确定图像的类别。通过MatLab,OpenCV,Viola Jones或深度学习。

什么是TensorFlow?
TensorFlow是Google的开源机器学习框架,用于跨越一系列任务进行数据流编程。图中的节点表示数学运算,而图表边表示在它们之间通信的多维数据阵列。

对象检测教程
先决条件
在演示之前,先看一下提前要准备的:
Python
TensorFlow
TensorBoard
Protobuf v3.4 或以上版本
建立环境
要下载TensorFlow和TensorFlow GPU,可以使用pip或conda命令:
1# For CPU2pip install tensorflow3# For GPU4pip install tensorflow-gpu# For CPU
2pip install tensorflow
3# For GPU
4pip install tensorflow-gpu
对于其他库,同样可以使用pip或conda来安装,代码如下:
1pip install --user Cython2pip install --user contextlib23pip install --user pillow4pip install --user lxml5pip install --user jupyter6pip install --user matplotlib
2pip install --user contextlib2
3pip install --user pillow
4pip install --user lxml
5pip install --user jupyter
6pip install --user matplotlib
接下来,我们有Protobuf:Protocol Buffers是Google的可扩展的用于序列化结构化数据。可将其视为XML,但更小、更快、更简单。
为了简单起见,我们将一个名为“Tensorflow”的文件夹下保留“models”和“protobuf”。接下来需要进入Tensorflow文件夹,并使用命令运行protobuf:
1"path_of_protobuf's bin"./bin/protoc object_detection/protos/"path_of_protobuf's bin"./bin/protoc object_detection/protos/
要检查是否有效,可以转到models> object_detection> protos中的protos文件夹,在那里可以看到每个proto文件都创建了一个python文件。
主要代码

设置环境后,需要转到“”目录并创建一个新的python文件。可以使用Spyder或Jupyter编写代码。
首先,导入所有库。
 1import numpy as np 2import os 3import six.moves.urllib as urllib 4import sys 5import tarfile 6import tensorflow as tf 7import zipfile 8from collections import defaultdict 9from io import StringIO10from matplotlib import pyplot as plt11from PIL import Image12sys.path.append("..")13from object_detection.utils import ops as utils_ops14from utils import label_map_util15from utils import visualization_utils as vis_utilimport numpy as np
 2import os
 3import six.moves.urllib as urllib
 4import sys
 5import tarfile
 6import tensorflow as tf
 7import zipfile
 8from collections import defaultdict
 9from io import StringIO
10from matplotlib import pyplot as plt
11from PIL import Image
12sys.path.append("..")
13from object_detection.utils import ops as utils_ops
14from utils import label_map_util
15from utils import visualization_utils as vis_util
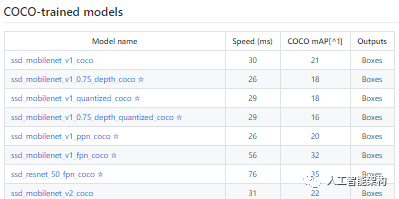
接下来,将下载在COCO数据集上训练的模型。COCO代表上下文中的公共对象,该数据集包含大约330K标记图像。模型选择非常重要,因为需要在速度和准确度之间进行权衡。根据你的需求和系统内存,必须选择正确的型号。
“models> research> object_detection> g3doc> detection_model_zoo”包含具有不同速度和准确度的所有模型。
接下来,我们提供Tensorflow生成的所需模型和frozen inference graph。
1MODEL_NAME = 'ssd_mobilenet_v1_coco_2017_11_17'2MODEL_FILE = MODEL_NAME + '.tar.gz'3DOWNLOAD_BASE = 'http://download.tensorflow.org/models/object_detection/'4PATH_TO_CKPT = MODEL_NAME + '/frozen_inference_graph.pb'5PATH_TO_LABELS = os.path.join('data', 'mscoco_label_map.pbtxt')6NUM_CLASSES = 90'ssd_mobilenet_v1_coco_2017_11_17'
2MODEL_FILE = MODEL_NAME + '.tar.gz'
3DOWNLOAD_BASE = 'http://download.tensorflow.org/models/object_detection/'
4PATH_TO_CKPT = MODEL_NAME + '/frozen_inference_graph.pb'
5PATH_TO_LABELS = os.path.join('data', 'mscoco_label_map.pbtxt')
6NUM_CLASSES = 90
此代码将从网上下载该模型并提取该模型的frozen inference graph。
 1opener = urllib.request.URLopener() 2opener.retrieve(DOWNLOAD_BASE + MODEL_FILE, MODEL_FILE) 3tar_file = tarfile.open(MODEL_FILE) 4for file in tar_file.getmembers(): 5  file_name = os.path.basename(file.name) 6  if 'frozen_inference_graph.pb' in file_name: 7    tar_file.extract(file, os.getcwd()) 8detection_graph = tf.Graph() 9with detection_graph.as_default():10  od_graph_def = tf.GraphDef()11  with tf.gfile.GFile(PATH_TO_CKPT, 'rb') as fid:12    serialized_graph = fid.read()13    od_graph_def.ParseFromString(serialized_graph)14    tf.import_graph_def(od_graph_def, name='')
 2opener.retrieve(DOWNLOAD_BASE + MODEL_FILE, MODEL_FILE)
 3tar_file = tarfile.open(MODEL_FILE)
 4for file in tar_file.getmembers():
 5  file_name = os.path.basename(file.name)
 6  if 'frozen_inference_graph.pb' in file_name:
 7    tar_file.extract(file, os.getcwd())
 8detection_graph = tf.Graph()
 9with detection_graph.as_default():
10  od_graph_def = tf.GraphDef()
11  with tf.gfile.GFile(PATH_TO_CKPT, 'rb') as fid:
12    serialized_graph = fid.read()
13    od_graph_def.ParseFromString(serialized_graph)
14    tf.import_graph_def(od_graph_def, name='')
接下来,将加载所有标签
1label_map = label_map_util.load_labelmap(PATH_TO_LABELS)2categories = label_map_util.convert_label_map_to_categories(label_map, max_num_classes=NUM_CLASSES, use_display_name=True)3category_index = label_map_util.create_category_index(categories)
2categories = label_map_util.convert_label_map_to_categories(label_map, max_num_classes=NUM_CLASSES, use_display_name=True)
3category_index = label_map_util.create_category_index(categories)
现在将图像的数据转换为numPy数组进行处理
1def load_image_into_numpy_array(image):2  (im_width, im_height) = image.size3  return np.array(image.getdata()).reshape(4      (im_height, im_width, 3)).astype(np.uint8)def load_image_into_numpy_array(image):
2  (im_width, im_height) = image.size
3  return np.array(image.getdata()).reshape(
4      (im_height, im_width, 3)).astype(np.uint8)
此处定义了用于测试目的的图像路径,对于i(1到n+1),有一个命名约定“image[i]”,n是提供的图像数量。
1PATH_TO_TEST_IMAGES_DIR = 'test_images'2TEST_IMAGE_PATHS = [ os.path.join(PATH_TO_TEST_IMAGES_DIR, 'image{}.jpg'.format(i)) for i in range(1, 8) ]'test_images'
2TEST_IMAGE_PATHS = [ os.path.join(PATH_TO_TEST_IMAGES_DIR, 'image{}.jpg'.format(i)) for i in range(1, 8) ]
此代码运行单个图像的推断,其中它检测对象、画框,并提供该特定对象的类和类的得分。
 1def run_inference_for_single_image(image, graph): 2  with graph.as_default(): 3    with tf.Session() as sess: 4    # Get handles to input and output tensors 5      ops = tf.get_default_graph().get_operations() 6      all_tensor_names = {output.name for op in ops for output in op.outputs} 7      tensor_dict = {} 8      for key in [ 9          'num_detections', 'detection_boxes', 'detection_scores',10          'detection_classes', 'detection_masks'11     ]:12        tensor_name = key + ':0'13        if tensor_name in all_tensor_names:14          tensor_dict[key] = tf.get_default_graph().get_tensor_by_name(15            tensor_name)16      if 'detection_masks' in tensor_dict:17        # The following processing is only for single image18        detection_boxes = tf.squeeze(tensor_dict['detection_boxes'], [0])19        detection_masks = tf.squeeze(tensor_dict['detection_masks'], [0])20        # Reframe is required to translate mask from box coordinates to image coordinates and fit the image size.21        real_num_detection = tf.cast(tensor_dict['num_detections'][0], tf.int32)22        detection_boxes = tf.slice(detection_boxes, [0, 0], [real_num_detection, -1])23        detection_masks = tf.slice(detection_masks, [0, 0, 0], [real_num_detection, -1, -1])24        detection_masks_reframed = utils_ops.reframe_box_masks_to_image_masks(25            detection_masks, detection_boxes, image.shape[0], image.shape[1])26        detection_masks_reframed = tf.cast(27            tf.greater(detection_masks_reframed, 0.5), tf.uint8)28        # Follow the convention by adding back the batch dimension29        tensor_dict['detection_masks'] = tf.expand_dims(30            detection_masks_reframed, 0)31        image_tensor = tf.get_default_graph().get_tensor_by_name('image_tensor:0')32        # Run inference33        output_dict = sess.run(tensor_dict,34            feed_dict={image_tensor: np.expand_dims(image, 0)})35        # all outputs are float32 numpy arrays, so convert types as appropriate36        output_dict['num_detections'] = int(output_dict['num_detections'][0])37        output_dict['detection_classes'] = output_dict[38          'detection_classes'][0].astype(np.uint8)39        output_dict['detection_boxes'] = output_dict['detection_boxes'][0]40        output_dict['detection_scores'] = output_dict['detection_scores'][0]41        if 'detection_masks' in output_dict:42          output_dict['detection_masks'] = output_dict['detection_masks'][0]43return output_dictdef run_inference_for_single_image(image, graph):
 2  with graph.as_default():
 3    with tf.Session() as sess:
 4    # Get handles to input and output tensors
 5      ops = tf.get_default_graph().get_operations()
 6      all_tensor_names = {output.name for op in ops for output in op.outputs}
 7      tensor_dict = {}
 8      for key in [
 9          'num_detections', 'detection_boxes', 'detection_scores',
10          'detection_classes', 'detection_masks'
11     ]:
12        tensor_name = key + ':0'
13        if tensor_name in all_tensor_names:
14          tensor_dict[key] = tf.get_default_graph().get_tensor_by_name(
15            tensor_name)
16      if 'detection_masks' in tensor_dict:
17        # The following processing is only for single image
18        detection_boxes = tf.squeeze(tensor_dict['detection_boxes'], [0])
19        detection_masks = tf.squeeze(tensor_dict['detection_masks'], [0])
20        # Reframe is required to translate mask from box coordinates to image coordinates and fit the image size.
21        real_num_detection = tf.cast(tensor_dict['num_detections'][0], tf.int32)
22        detection_boxes = tf.slice(detection_boxes, [0, 0], [real_num_detection, -1])
23        detection_masks = tf.slice(detection_masks, [0, 0, 0], [real_num_detection, -1, -1])
24        detection_masks_reframed = utils_ops.reframe_box_masks_to_image_masks(
25            detection_masks, detection_boxes, image.shape[0], image.shape[1])
26        detection_masks_reframed = tf.cast(
27            tf.greater(detection_masks_reframed, 0.5), tf.uint8)
28        # Follow the convention by adding back the batch dimension
29        tensor_dict['detection_masks'] = tf.expand_dims(
30            detection_masks_reframed, 0)
31        image_tensor = tf.get_default_graph().get_tensor_by_name('image_tensor:0')
32        # Run inference
33        output_dict = sess.run(tensor_dict,
34            feed_dict={image_tensor: np.expand_dims(image, 0)})
35        # all outputs are float32 numpy arrays, so convert types as appropriate
36        output_dict['num_detections'] = int(output_dict['num_detections'][0])
37        output_dict['detection_classes'] = output_dict[
38          'detection_classes'][0].astype(np.uint8)
39        output_dict['detection_boxes'] = output_dict['detection_boxes'][0]
40        output_dict['detection_scores'] = output_dict['detection_scores'][0]
41        if 'detection_masks' in output_dict:
42          output_dict['detection_masks'] = output_dict['detection_masks'][0]
43return output_dict
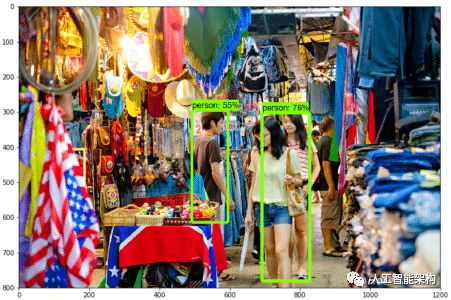
我们的最终循环将调用上面定义所有函数,将逐个对所有输入图像进行推理,这将为我们提供图像的输出,其中使用标签检测对象,并且该对象的百分比/分数类似于训练数据。
 1for image_path in TEST_IMAGE_PATHS: 2  image = Image.open(image_path) 3  # the array based representation of the image will be used later in order to prepare the 4  # result image with boxes and labels on it. 5  image_np = load_image_into_numpy_array(image) 6  # Expand dimensions since the model expects images to have shape: [1, None, None, 3] 7  image_np_expanded = np.expand_dims(image_np, axis=0) 8  # Actual detection. 9  output_dict = run_inference_for_single_image(image_np, detection_graph)10  # Visualization of the results of a detection.11  vis_util.visualize_boxes_and_labels_on_image_array(12      image_np,13      output_dict['detection_boxes'],14      output_dict['detection_classes'],15      output_dict['detection_scores'],16      category_index,17      instance_masks=output_dict.get('detection_masks'),18      use_normalized_coordinates=True,19      line_thickness=8)20plt.figure(figsize=IMAGE_SIZE)21plt.imshow(image_np)for image_path in TEST_IMAGE_PATHS:
 2  image = Image.open(image_path)
 3  # the array based representation of the image will be used later in order to prepare the
 4  # result image with boxes and labels on it.
 5  image_np = load_image_into_numpy_array(image)
 6  # Expand dimensions since the model expects images to have shape: [1, None, None, 3]
 7  image_np_expanded = np.expand_dims(image_np, axis=0)
 8  # Actual detection.
 9  output_dict = run_inference_for_single_image(image_np, detection_graph)
10  # Visualization of the results of a detection.
11  vis_util.visualize_boxes_and_labels_on_image_array(
12      image_np,
13      output_dict['detection_boxes'],
14      output_dict['detection_classes'],
15      output_dict['detection_scores'],
16      category_index,
17      instance_masks=output_dict.get('detection_masks'),
18      use_normalized_coordinates=True,
19      line_thickness=8)
20plt.figure(figsize=IMAGE_SIZE)
21plt.imshow(image_np)
现在,让我们看看如何检测实时视频中的对象。
使用Tensorflow进行实时物体检测
对于本演示,我们将使用相同的代码,但会调整一些内容,将使用OpenCV和相机模块使用网络摄像头的实时反馈来检测对象。
添加OpenCV库和用于铺货图像的相机,只需将以下行添加到导入库部分即可。
1import cv22cap = cv2.VideoCapture(0)import cv2
2cap = cv2.VideoCapture(0)
我们不需要从目录加载图像并将其转换为numPy数组,因为OpenCV将为我们处理。
替换这里:
1for image_path in TEST_IMAGE_PATHS:2image = Image.open(image_path)3# the array based representation of the image will be used later in order to prepare the4# result image with boxes and labels on it.5image_np = load_image_into_numpy_array(image)for image_path in TEST_IMAGE_PATHS:
2image = Image.open(image_path)
3# the array based representation of the image will be used later in order to prepare the
4# result image with boxes and labels on it.
5image_np = load_image_into_numpy_array(image)
得到这个:
1while True:2ret, image_np = cap.read()while True:
2ret, image_np = cap.read()
我们不会使用matplotlib进行最终图像显示,我们使用OpenCV。
删除这里:
1cv2.imshow('object detection', cv2.resize(image_np, (800,600)))2if cv2.waitKey(25) & 0xFF == ord('q'):3  cv2.destroyAllWindows()4  break'object detection', cv2.resize(image_np, (800,600)))
2if cv2.waitKey(25) & 0xFF == ord('q'):
3  cv2.destroyAllWindows()
4  break
OpenCV将使用先前初始化的相机对象打开名为“Object_Detection”的大小为“800*600”的新窗口。相机将等待25ms显示图像,否则将关闭窗口。
所有变更的最终代码:
 1import numpy as np 2import os 3import six.moves.urllib as urllib 4import sys 5import tarfile 6import tensorflow as tf 7import zipfile 8from collections import defaultdict 9from io import StringIO10from matplotlib import pyplot as plt11from PIL import Image12import cv213cap = cv2.VideoCapture(0)14sys.path.append("..")15from utils import label_map_util16from utils import visualization_utils as vis_util17MODEL_NAME = 'ssd_mobilenet_v1_coco_11_06_2017'18MODEL_FILE = MODEL_NAME + '.tar.gz'19DOWNLOAD_BASE = 'http://download.tensorflow.org/models/object_detection/'20# Path to frozen detection graph. This is the actual model that is used for the object detection.21PATH_TO_CKPT = MODEL_NAME + '/frozen_inference_graph.pb'22# List of the strings that is used to add correct label for each box.23PATH_TO_LABELS = os.path.join('data', 'mscoco_label_map.pbtxt')24NUM_CLASSES = 9025opener = urllib.request.URLopener()26opener.retrieve(DOWNLOAD_BASE + MODEL_FILE, MODEL_FILE)27tar_file = tarfile.open(MODEL_FILE)28for file in tar_file.getmembers():29  file_name = os.path.basename(file.name)30  if 'frozen_inference_graph.pb' in file_name:31    tar_file.extract(file, os.getcwd())32detection_graph = tf.Graph()33with detection_graph.as_default():34  od_graph_def = tf.GraphDef()35  with tf.gfile.GFile(PATH_TO_CKPT, 'rb') as fid:36    serialized_graph = fid.read()37    od_graph_def.ParseFromString(serialized_graph)38    tf.import_graph_def(od_graph_def, name='')39label_map = label_map_util.load_labelmap(PATH_TO_LABELS)40categories = label_map_util.convert_label_map_to_categories(label_map, max_num_classes=NUM_CLASSES, use_display_name=True)41category_index = label_map_util.create_category_index(categories)42with detection_graph.as_default():43  with tf.Session(graph=detection_graph) as sess:44    while True:45    ret, image_np = cap.read()46    # Expand dimensions since the model expects images to have shape: [1, None, None, 3]47    image_np_expanded = np.expand_dims(image_np, axis=0)48    image_tensor = detection_graph.get_tensor_by_name('image_tensor:0')49    # Each box represents a part of the image where a particular object was detected.50    boxes = detection_graph.get_tensor_by_name('detection_boxes:0')51    # Each score represent how level of confidence for each of the objects.52    # Score is shown on the result image, together with the class label.53    scores = detection_graph.get_tensor_by_name('detection_scores:0')54    classes = detection_graph.get_tensor_by_name('detection_classes:0')55    num_detections = detection_graph.get_tensor_by_name('num_detections:0')56    # Actual detection.57    (boxes, scores, classes, num_detections) = sess.run(58      [boxes, scores, classes, num_detections],59      feed_dict={image_tensor: image_np_expanded})60    # Visualization of the results of a detection.61    vis_util.visualize_boxes_and_labels_on_image_array(62        image_np,63        np.squeeze(boxes),64        np.squeeze(classes).astype(np.int32),65        np.squeeze(scores),66        category_index,67        use_normalized_coordinates=True,68        line_thickness=8)69    cv2.imshow('object detection', cv2.resize(image_np, (800,600)))70    if cv2.waitKey(25) 0xFF == ord('q'):71      cv2.destroyAllWindows()72      breakimport numpy as np
 2import os
 3import six.moves.urllib as urllib
 4import sys
 5import tarfile
 6import tensorflow as tf
 7import zipfile
 8from collections import defaultdict
 9from io import StringIO
10from matplotlib import pyplot as plt
11from PIL import Image
12import cv2
13cap = cv2.VideoCapture(0)
14sys.path.append("..")
15from utils import label_map_util
16from utils import visualization_utils as vis_util
17MODEL_NAME = 'ssd_mobilenet_v1_coco_11_06_2017'
18MODEL_FILE = MODEL_NAME + '.tar.gz'
19DOWNLOAD_BASE = 'http://download.tensorflow.org/models/object_detection/'
20# Path to frozen detection graph. This is the actual model that is used for the object detection.
21PATH_TO_CKPT = MODEL_NAME + '/frozen_inference_graph.pb'
22# List of the strings that is used to add correct label for each box.
23PATH_TO_LABELS = os.path.join('data', 'mscoco_label_map.pbtxt')
24NUM_CLASSES = 90
25opener = urllib.request.URLopener()
26opener.retrieve(DOWNLOAD_BASE + MODEL_FILE, MODEL_FILE)
27tar_file = tarfile.open(MODEL_FILE)
28for file in tar_file.getmembers():
29  file_name = os.path.basename(file.name)
30  if 'frozen_inference_graph.pb' in file_name:
31    tar_file.extract(file, os.getcwd())
32detection_graph = tf.Graph()
33with detection_graph.as_default():
34  od_graph_def = tf.GraphDef()
35  with tf.gfile.GFile(PATH_TO_CKPT, 'rb') as fid:
36    serialized_graph = fid.read()
37    od_graph_def.ParseFromString(serialized_graph)
38    tf.import_graph_def(od_graph_def, name='')
39label_map = label_map_util.load_labelmap(PATH_TO_LABELS)
40categories = label_map_util.convert_label_map_to_categories(label_map, max_num_classes=NUM_CLASSES, use_display_name=True)
41category_index = label_map_util.create_category_index(categories)
42with detection_graph.as_default():
43  with tf.Session(graph=detection_graph) as sess:
44    while True:
45    ret, image_np = cap.read()
46    # Expand dimensions since the model expects images to have shape: [1, None, None, 3]
47    image_np_expanded = np.expand_dims(image_np, axis=0)
48    image_tensor = detection_graph.get_tensor_by_name('image_tensor:0')
49    # Each box represents a part of the image where a particular object was detected.
50    boxes = detection_graph.get_tensor_by_name('detection_boxes:0')
51    # Each score represent how level of confidence for each of the objects.
52    # Score is shown on the result image, together with the class label.
53    scores = detection_graph.get_tensor_by_name('detection_scores:0')
54    classes = detection_graph.get_tensor_by_name('detection_classes:0')
55    num_detections = detection_graph.get_tensor_by_name('num_detections:0')
56    # Actual detection.
57    (boxes, scores, classes, num_detections) = sess.run(
58      [boxes, scores, classes, num_detections],
59      feed_dict={image_tensor: image_np_expanded})
60    # Visualization of the results of a detection.
61    vis_util.visualize_boxes_and_labels_on_image_array(
62        image_np,
63        np.squeeze(boxes),
64        np.squeeze(classes).astype(np.int32),
65        np.squeeze(scores),
66        category_index,
67        use_normalized_coordinates=True,
68        line_thickness=8)
69    cv2.imshow('object detection', cv2.resize(image_np, (800,600)))
70    if cv2.waitKey(25) 0xFF == ord('q'):
71      cv2.destroyAllWindows()
72      break
结语
希望大家能够喜欢这篇文章,现在了解Tensorflow的强大功能,以及检测图像和实时视频中的对象是多么容易。熟练掌握一门技术的关键,就是多动手实践。
长按订阅更多精彩▼


 1070
1070


 暂无认证
暂无认证


 到【灌水乐园】发言


要钱的大哥: 这个address和配置中的port有什么区别
XF_09: cache不是在内存和磁盘之间吗,为什么先查cache再查内存
「已注销」: 真厉害 好详细 问一下作者 想要实现王者荣耀对局的实时评分 能做出来吗
2401_84730596: 是这样,收集了流水,两周了,也不谈薪,问就是流程中,还要问其它offer情况,我想说,你们公司四轮技术面是啥也没结论吗,还要看其他公司的offer给钱,自己觉得自己面试水平低吗,感觉有点渣男行为
2401_84488984: 全景求是管理顾问公司就是干这个的。我老公三年前有一家工作20多天的公司简历没写,进行私密信息调查时,我老公跟它们说漏了一个月如果你们觉得有问题我就不把工资账单、社保记录、缴税信息还有前两家公司的领导信息发给你们了。他们说没事你发吧,offer 也发了。最后还是因为这不到一个月的入职信息li q n红灯。