


ACDSee Photo Studio Review: Image Editing Software for PC
If you're looking for non-subscription photo editing software with powerful features, ACDSee may be exactly what you need. Here's what we discovered.
Software | Software Reviews | By Yatharth Gupta
Shotkit may earn a commission on affiliate links. Learn more.
This ACDSee Photo Studio review is for any photographer in 2024 looking for an alternative image editor to Lightroom.
Despite Adobe being omnipresent among creatives, its monthly subscription model leaves many of us searching elsewhere.
ACDSee Photo Studio claims to be faster than Lightroom while offering several key features that Lightroom does not.

Affordably priced digital asset manager and non-destructive photo editor for Mac and Windows.
Notably, the layer editing, no-import workflow, GUI customization, and a powerful proprietary tool called Light EQ™ look exciting and useful.
I spent a few weeks testing out the latest version of ACDSee Photo Studio for Windows to write this review.
Let’s dive right in.
Table of Contents
What is ACDSee Photo Studio Ultimate?
- Offers a blend of digital asset management and editing features
- One-time purchase license is considerably cheaper compared to popular software like Adobe Photoshop and Lightroom Classic CC
- Free 30-day trial available for users to test the program before purchasing the license
- Powerful editing tools for image adjustment, retouching, and compositing
- Supports a wide range of file formats, including RAW
- Offers customizable workspace and hotkey mapping
- Good performance and speed
- Comprehensive user manual and online support resources available
- No cloud storage or synchronization options
- Some features have a steep learning curve for beginners
- Interface can be overwhelming and cluttered for some users
- Limited options for social media sharing
- Updates are not as frequent as some other software options
- Some advanced editing tools may not be as powerful as those in other software options
ACDSee is an image organizer, viewer, and image editor program for Windows, macOS, and iOS.
ACDSee comprises various programs and ‘packs’ used for Digital Asset Management, Photo Editing, and even video editing and conversion.
Choosing between all the options is rather confusing, so for the sake of simplicity, we have selected to review the most popular choice for photographers in 2024:
ACDSee Photo Studio Ultimate, which is only available for Windows PCs.
ACDSee Photo Studio Ultimate is an all-in-one software for your photo management and editing needs.
ACDSee shouldn’t be confused as a new tool that recently came into the market; instead, It’s been around for decades. The first iteration of the software was launched in 1994 for Windows 3.1!
The current all-in-one version of ACDSee Photo Studio that I’ve been testing allows users to process both RAW and JPEG image files.
Media mode
One of the main functions where it differs from Adobe Lightroom is that even though it has the option to import photos, it’s not a necessary step. It allows users to edit pictures without building a catalog within the program.
However, like Lightroom, the editing workflow is divided into different modules.
The program opens into the Manage module, where you can import or select photos you wish to edit.
The next tab is Media, where all the files in the folder selected are visible. This module gives an overview of the images in a grid.
Clicking on the View module opens the selected photos in a larger view. This module also features a filmstrip that shows all the images chosen previously in the Media tab.
In Develop tab, you get the controls for making basic edits to the photo, whether it’s a RAW or JPEG file. For example, there are controls to adjust exposure, white balance, color, and tone curve. It also features ACDSee’s proprietary Light EQ adjustment, which allows darkening or brightening different tones without affecting the rest of the photo.
Some of the other features in this tab include the option to add Color Look-up tables or LUTs, Split Tone, Photo Effects, Color overlays, and Gradient Map.
This tab offers controls similar to those seen in the Develop module of Lightroom and Adobe Camera Raw. However, ACDSee has additional features that are not available in other tools.
Next, there are more adjustments packed in the Edit module. The left side pane features filters, and you see a layer-editing panel on the right.
The filters in this tab are comparable to what you get with global adjustments in Adobe Photoshop.
Apart from the exposure, white balance, color, and geometry controls, ACDSee takes it to the next level by allowing you to add watermarks, borders, special effects, etc., without going into the menus like with Adobe Photoshop.
The layers panel is in many ways similar to that of Photoshop. For example, there are options to adjust opacity, create layer masks and make adjustments like exposure, levels, and more.
ACDSee Photo Studio is a feature-loaded program with many options in each module and the menus.
View Mode
You can create a contact sheet, PDF, slideshow, and HTML album from your photos or send your images to photo-sharing services like Zenfolio, SmugMug, or Flickr right from within the program.
With the People module, the program intelligently scans the faces in the imported photos and asks for the name of the people. Once it stores the names, it identifies people in the rest of the pictures and suggests more images of the same person.
ACDSee Photo Studio Ultimate offers an exciting blend of features that takes it beyond a photo editing tool. Its robust photo management, and advanced features make it one of the most comprehensive tools comparable to Adobe Lightroom, Photoshop, and other software like Luminar.
Key Features of ACDSee Photo Studio
ACDSee functionality is divided into different modes: manage, media, view, develop, and edit.
It offers all the features from organizing your photos to editing and sharing in one single window.
Below, we’ll look at the key components in each mode of ACDSee Photo Studio Ultimate:
Manage Mode:
This module gives you all the features for managing and organizing photo collections. You can browse photos in folders, sort catalogs, and share them online.
The right pane features navigation with folder, catalog, and calendar tabs to help you filter the photo selection based on different criteria. Below the folder navigator, a small preview box displays EXIF data and a histogram for the selected photo.
On the left, you get a full-height box with IPTC, Metadata, and EXIF info and options to rate, categorize, add keywords to the photo, and create new collections.
ACDSee offers complete layout customization with controls to hide, resize or move panes and create custom workspaces best suited for your workflow.

Develop mode offers non-destructive raw editing
One of this program’s many conveniences is the ability to share images directly to FTP, email, and websites like Flickr, SmugMug, and Zenfolio. It also allows you to generate slideshow, PDF, PPT, and Online Albums from your photos in just a few clicks.
Similar to Adobe Bridge and Lightroom, in this mode, you can import photos directly from your camera to folders on your drive.
Several adjustments are available for batch processing pictures in bulk by opening them directly in Develop and Edit modules.
This mode also features the Action menu, which offers built-in actions to quickly adjust the lighting, geometry, and color and apply special effects. It also allows you to record your own actions and save them for later use.
Here’s a list of some of the unique features available in this module:
Selective Browsing: Sort and filter photos on different criteria such as date range, place, people, and more.
Workspace: Create your own workspaces that work best for your editing workflow and save.
Catalog: Automatically generate categories based on image properties such as shutter speed, ISO, white balance, focal length, and more.
Image Basket: Allows quickly grouping a bunch of photos you wish to edit into a temporary basket, eliminating the need to create a separate folder for an editing session.
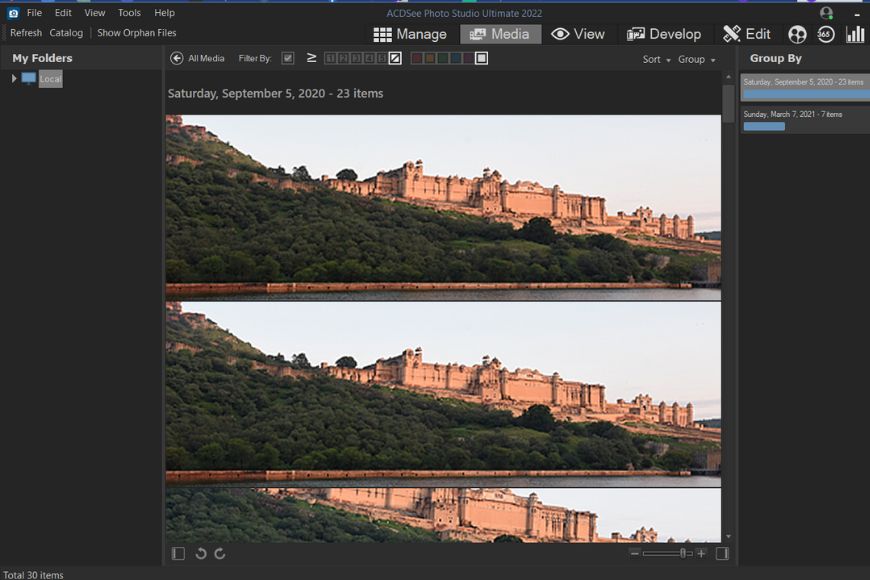
Media Mode
As the name suggests, this module shows a streamlined and organized view of all the photos previously browsed or cataloged in Manage mode.
On the window’s left side is a ‘My Folders’ pane, where you’ll find the selected media folders. It’s hidden by default but can be enabled or disabled with the button on the bottom left of the window.
ACDSee makes it easy to label and populate files for an organized workflow. For example, it allows you to create color labels for your images in the Manage module, which can be quickly selected in this tab with the ‘Filter by’ option on the top of the viewing panel.
On the other hand, Sort and Group dropdown menu allows you to group or arrange files based on various criteria such as date taken, file size, keywords, location, rating, etc.
You can directly open photos in Develop and Edit modules from the viewing area by going into the right-click menu. I’ll discuss these modes in the next section.
If you wish to see a grouped view of your media files, you can enable it by toggling the bottom right button, which would display a list of groups based on dates.
The Media module serves as a great photo library between importing and editing photos; it gives you an overall view of your photos and videos.
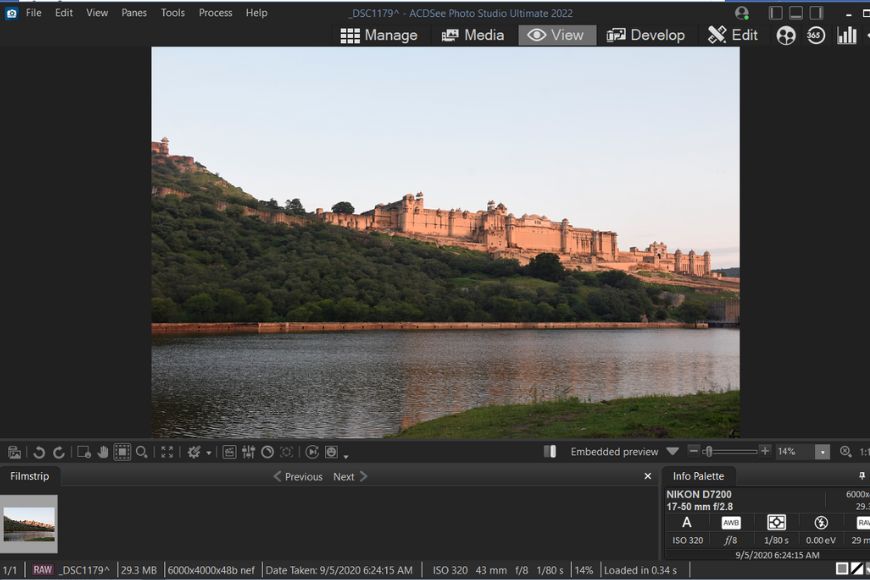
View Mode
When you select photos and move to the View tab, you’ll see the chosen photos in a filmstrip at the bottom of the window. The viewing area in this module will show the preview of the selected asset from the collection.
Apart from that, you also get some advanced options within this module to make your workflow easier in the following steps. It also allows you to add captions to the photos and tag files.
Here, you can view not only photos but also audio, video, documents, and other media files.
ACDSee allows you to add photos to the image basket directly from the filmstrip. An image basket is a temporarily selected collection of photos for editing purposes, which eliminates the need to create a separate folder and copy images you wish to edit in a session.
View mode also features FaceTool, which detects faces in a picture and allows you to name particular people to classify the images further.
Navigational controls have zoom, select, scroll, and full-screen options. ACDSee also supports making edits in another editing application; you can configure your chosen application by going to External Editors. For example, this window lets you open the selected image directly in Lightroom.
For instant corrections, there are Auto Light EQ and Auto Lens options which automatically correct exposure and offer quick effects like Orton, Black and White, Sepia, and Lomo.
Like the previous module, you can also use built-in or user-created actions with Actions Browser, which can be toggled on and off with the button.
The bottom right of the screen features an Info Palette that displays EXIF information such as camera, lens, file dimensions, size, focal length, and exposure settings.
Develop mode
Develop Mode
If you shoot RAW images and prefer editing in a non-destructive way, this mode would serve you well.
Develop mode works similarly to Lightroom and Adobe Camera Raw in many ways. However, it comes with many unique features.
The non-destructive editing with develop mode is best suited for RAW files as the adjustments are not permanent and can be reverted to the original.
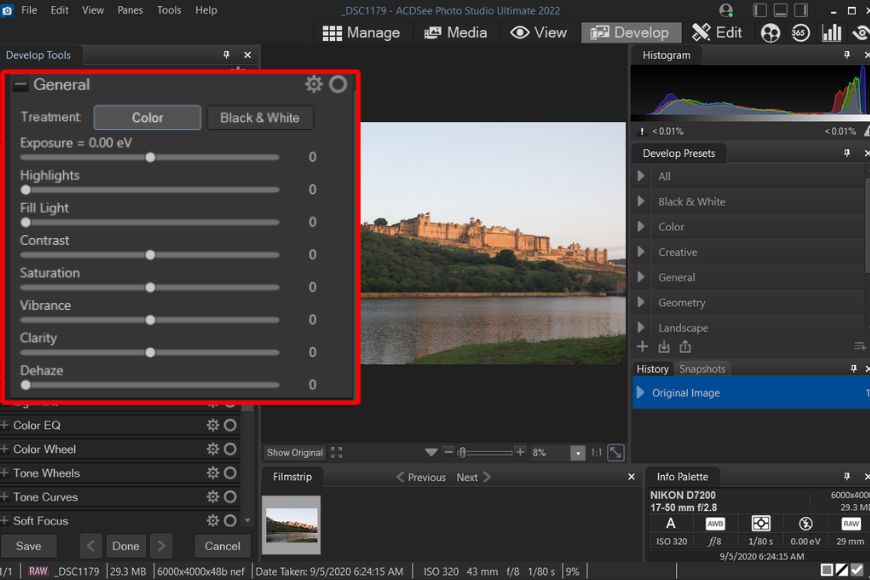
Exposure controls in Develop mode
It not only works with RAW photos but also JPEG and other image file types.
You get a wide range of features, from the basic exposure adjustments to the controls for lighting, tone curves, color, geometry, and more.
Under Develop Tools on the left, you’ll find settings divided into four categories; Tune, Detail, Geometry, and Repair.
The first tab, Tune, offers not only basic adjustments like exposure, color, white balance, and saturation but also advanced tools like Light EQ, Color EQ, Tone wheels, Color LUTs, Split toning, and other effects.
Let’s take a look at some of the advanced features in detail.
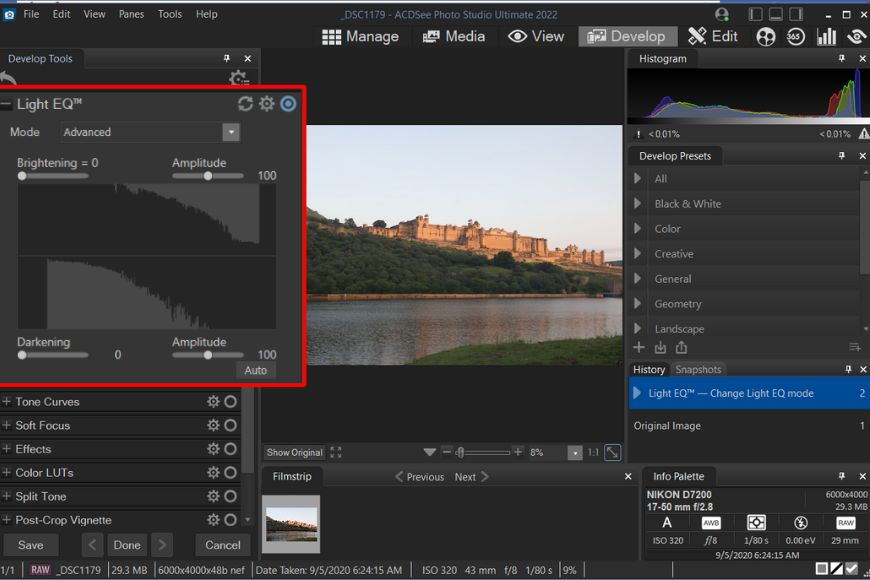
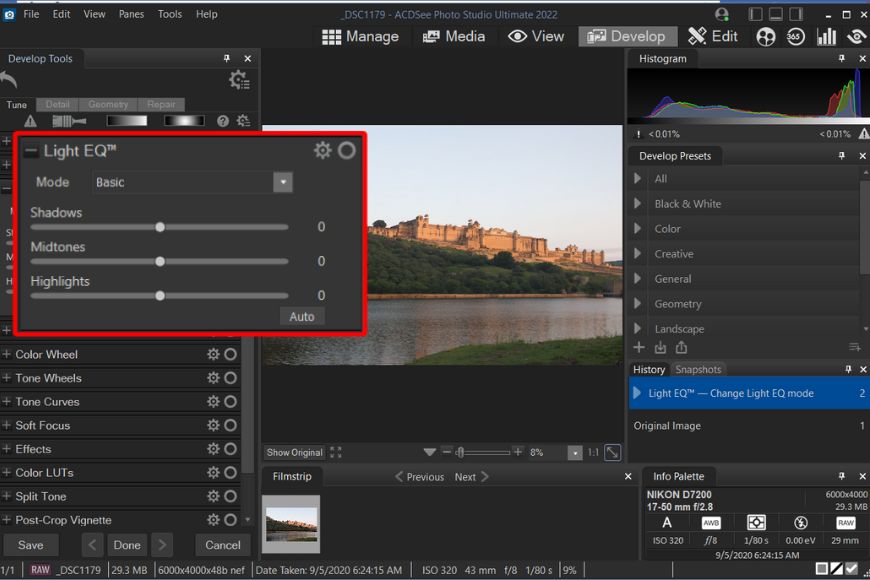
- Light EQ: ACDSee describes this feature as total lighting control. It allows targeting specific tones in the photo without affecting the rest of the tones. There are three modes given to control the effect: Basic Light EQ offers quick and easy adjustment with shadows, midtones, and highlights slider and an auto button for automatic corrections. Standard Light EQ controls resemble that of a sound equalizer; however, the vertical sliders here are tone bands, each representing a different tone in the photo. You can choose as many as nine bands for precision adjustment.
Advanced Light EQ offers full control over the entire tonal range of an image. You can darken or brighten specific tones. It works by clicking and dragging on the target area on the image or by tweaking darkening, brightening, and amplitude sliders.
Basic Light EQ
- Color EQ: This tool allows you to fine-tune and enhance specific colors. It works similar to HSL in Lightroom and Adobe Camera Raw. However, it also offers additional control for color contrast. You can also use it with Develop Brush, Gradient, and Radial gradient for targeted adjustments.
- Tone Wheel: With this tool, you can add color to mid-tones, highlights, and shadows. It’s somewhat similar to the Color Grading system in Adobe products. Though, I found it more complex compared to Adobe counterpart.
- Color Wheel: ACDSee offers different color tools, each great for different tasks. With the color wheel, you can make precise adjustments to colors. It offers hue, saturation, brightness, and contrast sliders. It is convenient in situations such as when you want to make the blue sky bluer, add punchiness to the red dress, or make the grass another shade of green and brighter.
The above are some of the key features you find in the Tune tab, but the feature list doesn’t end here.
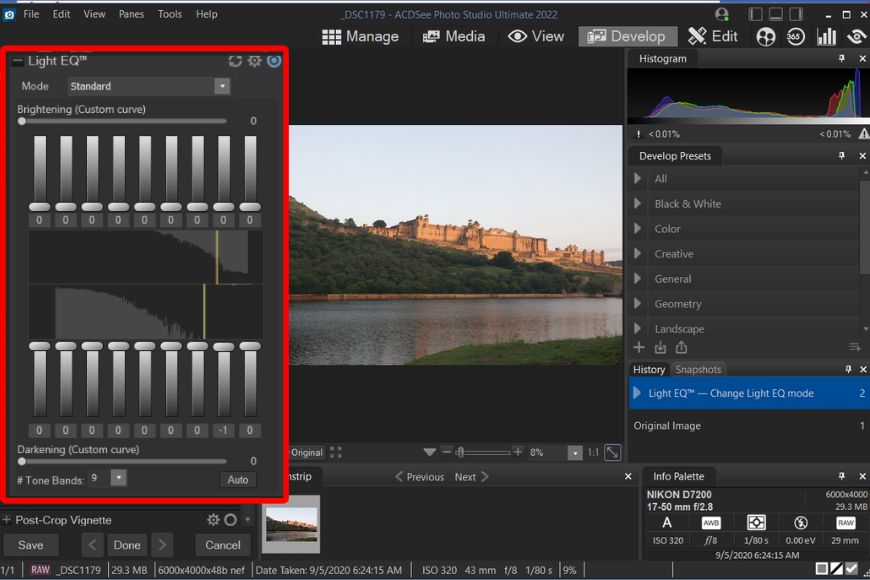
Standard Light EQ offers total control over tones
The Detail tab includes sharpening, noise reduction, skin tuning, and chromatic aberration corrections.
On the other hand, the Geometry tab offers controls for lens correction, rotation, perspective, crop, vignette, etc.
In the Repair section, you’ll find healing, cloning, and red-eye correction controls to clean up your image.
Similar to the View mode, you also get a filmstrip that shows the previously selected contents.
If you prefer total control over the effects, you can combine many adjustments with Develop Brush, a masking tool for targeted editing.
At any point, you can undo the effects with the History feature, where all the previous steps are recorded and can be used to go back and forth as needed.
The right side of the screen features Develop Presets, which are built-in looks that can be instantly applied, including black and white, landscape, wedding, and other scene-specific effects.
Edit Mode
Edit mode is the next and last step in the workflow, where the image is transferred with limited RGB data, contrary to the RAW data you access with the Develop mode.
What makes this mode different is the layer-based editing capabilities. If you’re an Adobe user, you’ll find the process similar to opening a RAW file in Camera Raw and further taking it into Photoshop.
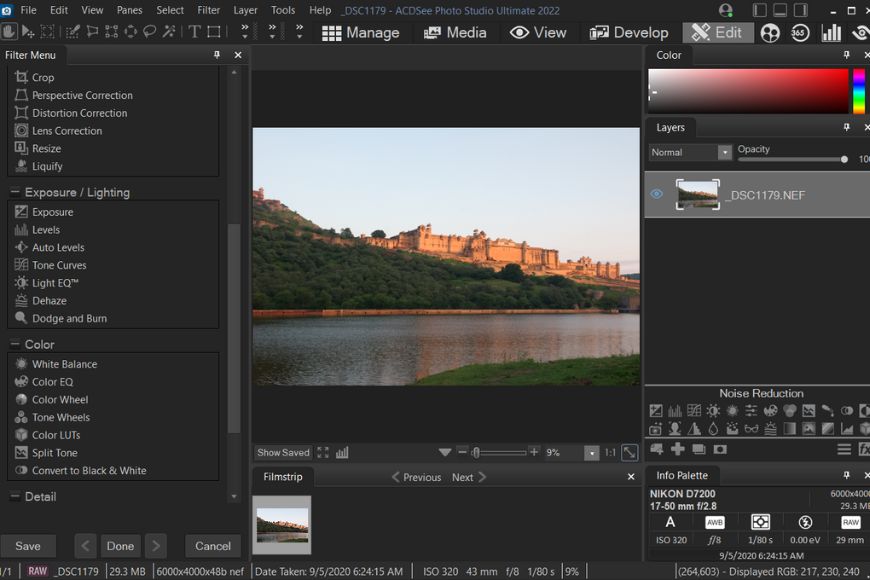
Edit Mode
The Edit screen consists of Filter Menu on the left, Image Preview in the center, and Layers Panel on the right.
On the top, there’s a tools panel featuring move, select, lasso, gradient, magic wand, brush, etc.
The bottom also displays a filmstrip that we’ve seen in Develop and View modes.
Many of the tools on this screen are repetitive such as repair tools, geometry, color, details, exposure, etc. Most of the settings are also available in Develop mode as well.
However, there are some unique features, such as Add menu, that allow to automate redundant tasks such as adding watermarks, borders, vignettes, and other special effects.
Some more of the key features available are dodge and burn, liquify, lens correction, split toning, and detail brush.
Coming to the layers panel, you’ll find the adjustment layers panel just below it. Each adjustment creates a separate layer that comes with a layer mask and controls.
Like Photoshop, you can tweak the opacity and blend mode of the layers or mask specific areas with a brush. You also get an eye button to toggle the visibility of a layer.

Filter options and Layers module
The adjustments available are curves, levels, exposure, add color, Light EQ, white balance, LUTs, etc. Most of them are sliders or options we’ve seen previously in the filter menu as well as Develop mode.
One thing to note is that the filter menu doesn’t work until you select a layer with the photo.
Overall, Edit mode takes your editing to the next mode with non-destructive layer-based editing that opens multiple creative possibilities.
Overall Performance
ACDSee Photo Studio Ultimate offers all the editing tools and asset management features you’ll ever need in a software.
It has the potential to replace many of the tools from Adobe creative cloud suite. However, it is a complex bundle of tools that comes with a steep learning curve.
The performance is great when it comes to photo management; the interface is user-friendly and intuitive for most photographers.
What sets it apart is the tools like people mode, groups, image basket, etc.
Regarding photo editing capabilities, ACDSee offers everything you’d find in other photo processing tools, plus so much more.
The operation is virtually lag-free on my decent-specs laptop; however, when editing multiple raw files in the image basket, you might experience very slight delays.
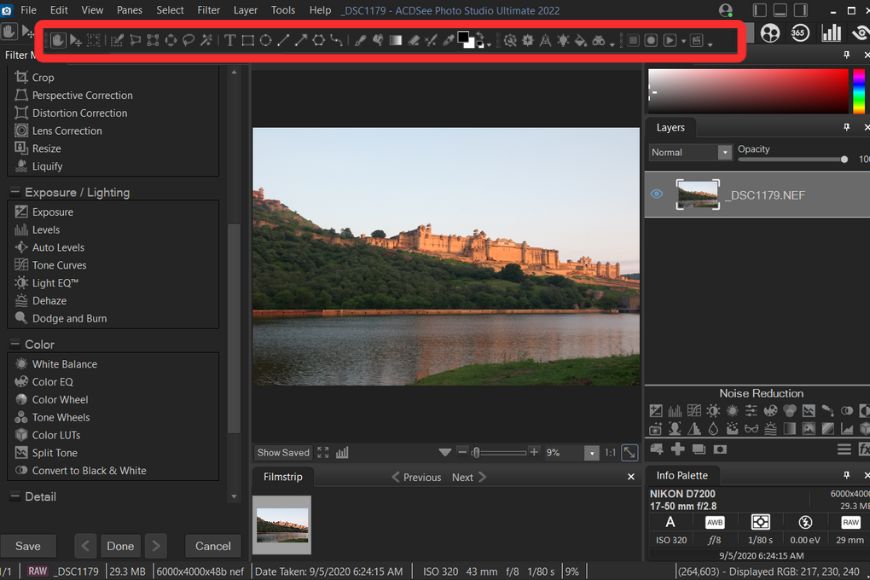
Toolbar offers various selection tools, brushes and other options
Photo Studio Ultimate comes loaded with multiple tools, making it complex for new users and considerably slowing down the workflow.
Also, the lack of detailed manual and tutorials leave you guessing about how to use some of the advanced controls such as Light EQ.
In addition, many features repeat in multiple modes and sometimes repeat within a mode itself, making it needlessly confusing. For example, Color EQ is available in Develop and Edit mode, and Light EQ is part of the filter menu and adjustment layers. Like any other photo editing software, this would take time to get used to it.
Overall, I’m pleased with the feature set and processing capabilities of ACDSee Photo Studio Ulitmate.
Alternatives to ACDSee Photo Studio Ultimate
While ACDSee Photo Studio Ultimate is a very powerful and versatile software, it’s important to note there are many alternatives available in the market. Here are a few options you might want to consider:
Affinity Photo: It’s an affordable alternative that offers many similar features for image editing, retouching, and compositing. With its user-friendly interface and one-time payment model, Affinity Photo is quite popular among beginner photographers.
Adobe Lightroom: Lightroom is one of the most used photo editing software and has been largely adopted by photographers worldwide. However, its big disadvantage is the subscription model, which makes it less desirable for newcomers.
GIMP: It’s open-source software that is completely free to use. It offers a great feature set; however, due to the open-source nature of the tool, the updates are slow, and no support is provided except on the community forums.
Luminar: Luminar is one of the best alternatives in the list as it offers almost all the tools you get with ACDSee as well as some useful AI functions as well. However, the price is comparatively on the higher side.
Ultimately, the choice depends on individual needs and preferences. There are various other factors that would affect the buying decision, such as cost, features, and liking towards a particular product.
ACDSee Photo Studio Ultimate 2022 offers a good balance between functionality and affordability, but it’s best to explore other options to find the best fit for your workflow requirements.
Value for Money
Finding a balance between features and affordability can be challenging when it comes to photo editing software.
ACDSee Photo Studio Ultimate offers a blend of digital asset management and editing features, making it a great value for money.
The one-time purchase license is considerably cheaper compared to popular software like Adobe Photoshop and Lightroom Classic CC. This makes ACDSee Photo Studio particularly attractive.
ACDSee also offers a free 30-day trial for users to test the program before purchasing the license.
Overall, it’s an excellent value-for-money product.
How much does ACDSee Photo Editor cost?
The full price of ACDSee Ultimate for PC and Mac is US$99.99 – check the price in your currency here for PC and here for Mac.
There’s also a newer product called ACDSee Free, a fast file browser ideal for viewing RAW images that’s available free of charge from here.
ACDSee Photo Studio Ultimate Review | Conclusion
ACDSee Photo Studio Ultimate is a powerful, all-in-one software that caters to all the photo editing and asset management needs of any photographer, whether you’re a pro or a beginner.
If you’re looking for software that offers everything in a single window, ACDSee would be one of the best options for you.
Have you tried ACDSee Photo Studio Ultimate yet? Let me know your experience and thoughts in the comments.

Yatharth Gupta is a seasoned portrait and travel photographer based in India. He is also a writer and a blogger and loves to explore new places.

👋 WELCOME TO SHOTKIT!

🔥 Popular NOW:
